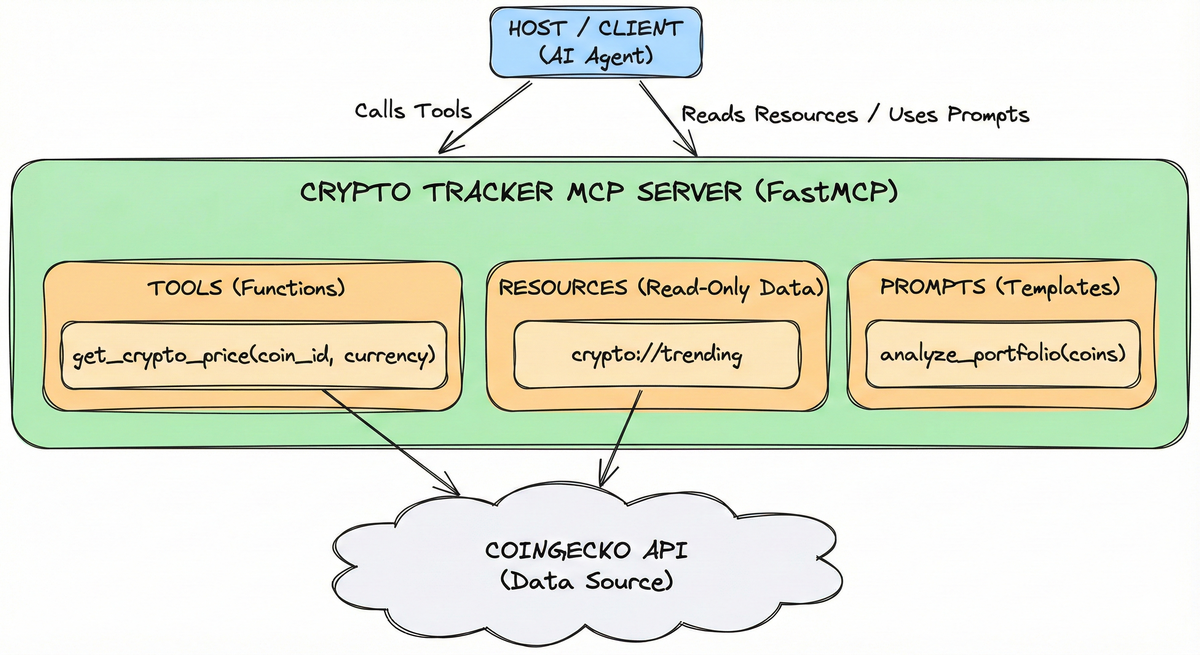
TL;DR: In this part, we stop talking theory and write code. We will build a fully functional Crypto Tracker MCP Server using FastMCP. It connects to the real CoinGecko API, exposes live market data as Resources, lets the AI fetch prices via Tools, and includes a “Financial Analyst” Prompt.
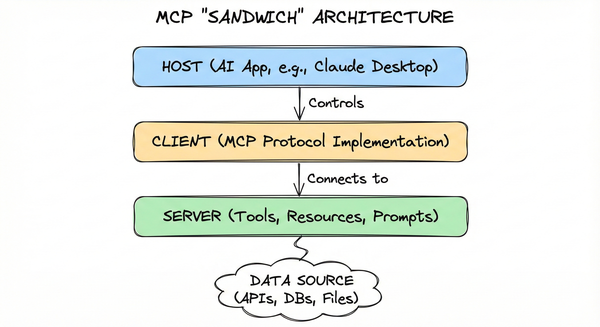
This post is part of a MCP series. If you haven’t read Part 3 yet, start there to understand the architecture.
1. The Setup#
We are using fastmcp because it handles the heavy lifting (JSON-RPC handshake, error handling, typing).
Prerequisites:
- Create and activate a virtual environment (optional but recommended)
- Install FastMCP and dependencies
pip install "mcp[fastmcp]" httpx uvicornuv add "mcp[fastmcp]" httpx uvicorn
2. The Code (crypto_server.py)#
Create a file named crypto_server.py.
| |
3. How to Run It#
One of the best features of FastMCP is flexibility. You can run the same code in two completely different ways depending on your architecture.
3.1 Mode A: Local STDIO (The “Desktop” Way)#
This is how you connect the server to Claude Desktop or Cursor. The host application spawns your Python script directly and talks over standard input/output pipes.
Run in Terminal (to test):
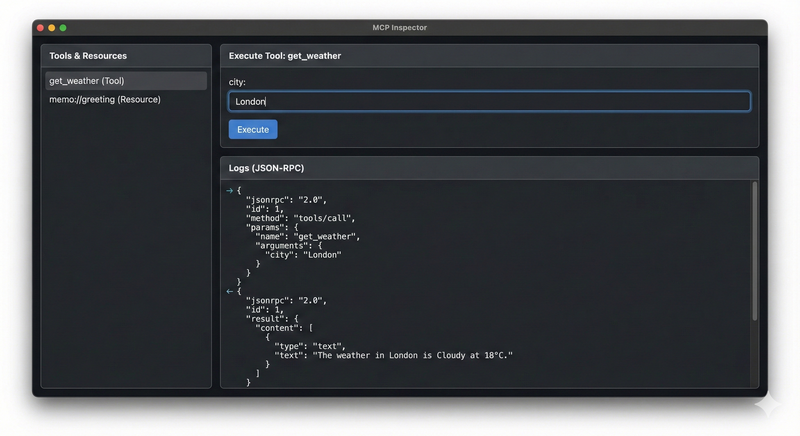
# This starts the server in "Inspector" mode (a web UI for debugging)
mcp dev crypto_server.pyAction: Click the get_crypto_price tool in the UI, type “bitcoin”, and hit Run. You’ll see the real live price
Configure in Claude Desktop: Edit your claude_desktop_config.json:
{
  "mcpServers": {
    "crypto": {
      "command": "python",
      "args": ["/absolute/path/to/crypto_server.py"]
    }
  }
}
3.2 Mode B: HTTP / SSE (The “Remote” Way)#
If you want to deploy this server to the cloud (e.g., AWS, Render) so a remote agent can access it, you can’t use pipes. You need HTTP.
FastMCP supports this natively. You don’t need to change your code, just how you launch it. We can use uvicorn (a standard Python web server) to serve the MCP application.
- Run with Uvicorn:
# This exposes the server on port 8000
# Format: uvicorn filename:mcp_instance_name ...
uvicorn crypto_server:mcp --port 8000- How the Client Connects: An MCP Client (like a cloud agent) would now connect to:
- SSE Endpoint: http://localhost:8000/mcp (For receiving events)
This is the exact same functionality, just transported over the web instead of a local pipe.
4. Seeing it in Action#
Once connected, you can ask your AI Agent (Eg: Claude):
"Analyze my portfolio: bitcoin, solana, and peipei."
What happens under the hood?
- Prompt Loading: The AI loads your
analyze_portfoliotemplate. - Tool Execution: It sees the instruction to fetch prices and automatically calls
get_crypto_price("bitcoin"),get_crypto_price("solana"), etc. - Resource Reading: It reads
crypto://trendingto check momentum. - Final Answer: It combines the live data into a coherent financial summary.
5. Next Steps#
Congratulations! You have built a fully functional MCP server that connects to a real-world API, exposes Tools, Resources, and Prompts, and can run both locally and remotely.
Ready for the hard truth? In the next post, we take on the role of devil’s advocate and explore 5 core challenges of MCP—from complexity overhead to security concerns. Continue to Part 5.